EzyVet is integrated with PayJunction. Simply follow the instructions below to connect EzyVet with your PayJunction account and Smart Terminal.
Process Overview
I. Activate PayJunction Smart Terminal (in PayJunction)
II. Create PayJunction API Credentials (in PayJunction)
III. Create a Hosted Payments shop (for manual Payments)
IV. Save the PayJunction API Credentials (in ezyVet)
V. Save the Hosted Payment (in ezyVet)
VI. Save the Smart Terminal (in ezyVet)
VII. Configure ezyVet Payment Methods (in ezyVet)
VIII. Turn the Integration On (in ezyVet)
I. Activate PayJunction Smart Terminal
Instructions to activate PayJunction Smart Terminals can be found here:
II. Create PayJunction API Credentials
-
Log into your PayJunction account as an Administrator, go to More, then select API Credentials.
-
In the top-right corner of this view, click the + New API Credential button.
- Leave the Type dropdown menu set to "Unrestricted Credential"
-
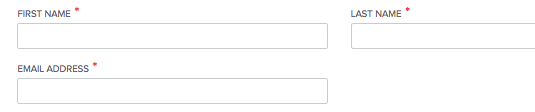
Enter a First Name, Last Name and an Email Address
To ensure that report titles lineup properly between PayJunction and ezyVet, please use the following naming convention:- FIRST NAME: ezyVetAPI
- LAST NAME: Name of the location or business unit (no spaces).
-
EMAIL ADDRESS: noreply@payjunction.com
-
Create a new unique Username and Password.
For the Username: Use the same First and Last name listed above, without spaces.
For the Password: Use at least 12 characters, with at least one uppercase, one lowercase and one number.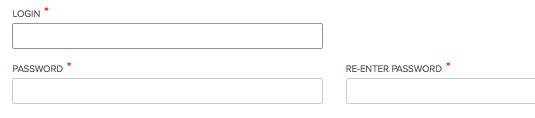
- Click the Submit button at the bottom of the page to save the new API credentials
III. Create a Hosted Payments Shop (for manual payments)
- Log into your PayJunction account as an Administrator, go to More, then select Hosted Payments.
-
On the upper right of the screen click on + New Shop.
- For the SHOP NAME: Use EV_name_of_your_location, (EV stands for ezyVet).
- Change the METHOD from GET to POST.
- Set EMAIL NEW ORDERS TO: noreply@payjunction.com.
- Email PayJunction Receipt to Customer : set accordingly
- Click on the Submit button at the bottom of the page.
-
Adjust Hosted Payment Fields:
-
Click on the 3-Dots menu of the Hosted Payments you just created. and click Shop Fields.
-
Update the fields to - Display / Hide / Required to match the image below:
- Click on Submit.
-
-
Adjust the security settings (AVS) for the Hosted Payment and the API:
- Click on More button on the lower left side of the screen.
-
Then click Accounts.
-
Select the account you want to work on.
-
The following steps need to be done for the PayJunction API and Hosted Payments.
Click EDIT on the right hand side. -
Choose the type of security settings you wish to toggle. We recommend set it to check "Match Zip" only:
- Click Submit.
- Repeat the same setting for the API.
Note: If your business has multiple location, each of which are using different TIDs (Batches), the entire Step III and V will need to be repeated for each location, with each Hosted Payment pointing to the appropriate TID.
IV. Save the PayJunction API Credentials in ezyVet
-
Log into EzyVet and click on the Admin tab, then hover over the main dropdown and select Integrations:
-
On the upper left of the screen, Integration should already be selected.
On the right part of the screen, type PayJunction in the search field, and Click on PayJunction API on the dropdown list: -
On the following screen:
- Select the Division you want that integration available for.
-
Type in your API credentials (Username and password) then click on:
Test Credentials. -
You should see on the bottom left of the screen a pop-up message confirming your API credentials are correct. Once you see that message click on Save at the top.
If you have multiple Divisions, EzyVet allows you to save individual API credentials for each Division.
V. Save the Hosted Payment shop in ezyVet
-
On the upper left part of the screen click on Integrations to get a New blank Integration Tab:
On the right part of the screen, type PayJunction in the search field, and Click on PayJunction Hosted Payment on the dropdown list: -
In the Hosted Payment setup screen:
Follow those steps:- Click the first magnifying glass to choose the Division.
- Click on the second magnifying glass to select the API you will use for that Division. The API credential that you saved on the previous step (IV-4), will be available on the dropdown list.
- In the Store name field, type in the Hosted Payment Shop name
- Confirm that the Terminal associated to the Hosted payment page created on step III is selected in the Account ID dropdown.
- For the Prompt storing customer's card, switch to Always Save if you want to guarantee saved cards will be available to Refunds through ezyVet.
-
Click on Test Store. You should see the following confirmation message "The PayJunction store is valid" at the bottom right of the screen:
-
Click Save.
If you are migrating from one ezyVet site to another, you may encounter the following error. This typically happens when the Account ID is still in use on the old ezyVet site. To resolve this, go to the old ezyVet site, locate the PayJunction Hosted Payment integration that is using the same Account ID, and disable it. -
Once the Hosted Payment page Saved successfully, click on Validate Account, you should see the following message:
Note: If your business has multiple location, each of which are using different TIDs (Batches), the entire Step III and V will need to be repeated for each location, with each Hosted Payment pointing to the appropriate TID.
VI. Save the Smart Terminal in ezyVet
-
On the upper left part of the screen click on Integrations to get a New blank Integration Tab:
On the right part of the screen, type PayJunction in the search field, and Click on PayJunction on the dropdown list: -
In the PayJunction Smart Terminal setup screen:
Follow those steps:
- Click the second magnifying glass to choose the Division.
- Click on the third magnifying glass to select the API you will use for that Division. The API credential that you saved on the previous step (IV-4), will be available on the dropdown list.
- In the Smart Terminal ID field, you should have a dropdown with the list of Smart Terminals activated on step I. Select the Terminal you want to connect to your ezyVet Division.
- Select the Terminal ID you want to associate with that Smart Terminal.
- For the Terminal Name (to display in ezyVet), we recommend typing the same name as you have on the field above.
- For the Prompt storing customer's card, switch to Always Save if you want to guarantee saved cards will be available to Refunds through ezyVet.
-
Click on Test Terminal. You should see the following confirmation message "Sent payment request to terminal" at the bottom right of the screen:
- Click Save.
Note: If your business has multiple Smart Terminals, the entire Step VII must be repeated for each device.
VII. Configure ezyVet Payment Methods
Payment Methods that are named Visa, Mastercard, American Express, Discover cannot be used to charge a customer. Instead, these payment methods allow your staff to manually adjust customer ledgers if a transaction is processed outside of ezyVet.
This step will create new PayJunction Payment Methods that will appear on the New Payment screen. These Payment Methods will be used by staff to collect payment for an invoice.
Go to the Payment Methods screen
-
On the top right drop-down menu, select Financial:
-
Click on Payment Method:
Create PayJunction Payment Methods
Most accounts are usually setup with the following Payment Methods:
- PayJunction Smart Terminal: for credit cards processed using the Smart Terminal.
- PayJunction Keyed: for manually keyed-in credit cards transactions.
- PayJunction Remote: for keyed-in "remote payment" credit cards transactions.
- PayJunction ACH: for keyed eCheck transactions. (if applicable)
The following steps need to be repeated for each Payment Method.
PayJunction Smart Terminal:
- Type "Smart Terminal" in the name field.
- Select Terminal Payment
- Click Save
PayJunction Keyed (Manual):
- Type "Manual" in the name field.
- Select Manual Card Entry
- Select in the Hosted Payment Integration lookup the Hosted Payment page you want to use in this location.
- Click SAVE
Remote Payments:
- Type "Remote" in the name field.
- Select Remote Payment
- Select in the Hosted Payment Integration lookup the Hosted Payment page you want to use in this location.
- Remote payment link duration in days: Leave at default, 10 days.
- Click SAVE
PayJunction ACH (Checks):
- Type "ACH" in the name field.
- Select ACH Payment
- Click SAVE
VIII. Turn the Integration On
This is the only step that needs to be repeated by all staff members, and that does NOT require Administrator access.
-
On the upper right of the screen, click on the credit card machine icon:
-
For each of the 3 dropdowns, select the appropriate value for that location.
- Click in Update.
Note: the Default Payment Terminal dropdown shows 2 distinct values:
- The Nickname of the Smart Terminal,
- The number of the Terminal ID (associated with the Smart Terminal in step VII).
BROWSER SETUP INSTRUCTIONS
For Keyed in transactions, EzyVet needs to load PayJunction's Hosted Page inside a Pop-Up.
By default, most browsers prevent Pop-Ups, so you will need to adjust the settings to allow Pop-Ups on your browser.
Here are the instructions for all the widely used Browsers:
Chrome:
https://support.google.com/chrome/answer/95472?co=GENIE.Platform%3DDesktop&hl=en
Firefox:
https://support.mozilla.org/en-US/kb/pop-blocker-settings-exceptions-troubleshooting
Internet Explorer:
https://support.microsoft.com/en-us/help/17479/windows-internet-explorer-11-change-security-privacy-settings
Edge:
https://support.microsoft.com/en-us/help/4026392/windows-block-pop-ups-in-microsoft-edge
Contact
Support: https://www.ezyvet.com/support/
Phone Support: 1 844 439 9838